Getting Containers for AI-LAB
Most applications on AI-LAB run inside containers - self-contained environments that include all the software and dependencies you need. AI-LAB uses Singularity to run containers.
What is a Container?
A container is like a pre-packaged software environment that includes:
- The application (Python, PyTorch, TensorFlow, etc.)
- All required libraries and dependencies
- System tools and configurations
- Everything needed to run your code
Think of it as a complete, portable computer environment that works the same way every time.
Three Ways to Get Containers
- Use pre-downloaded containers - Quickest option
- Download containers - For specific versions
- Build your own container - For custom environments
Which Method Should You Choose?
| Method | When to Use | Time Required | Difficulty |
|---|---|---|---|
| Pre-downloaded | Getting started, common frameworks | Instant | Easy |
| Download | Need specific version, latest updates | 10-20 minutes | Easy |
| Build | Custom requirements, specific packages | 30+ minutes | Advanced |
1. Pre-downloaded Containers
The easiest way to get started is using containers that are already available on AI-LAB. These are stored in /ceph/container and are regularly updated.
Available Containers
Check what's available:
Common containers include:
- Python: Basic Python environment
- PyTorch: Deep learning with PyTorch
- TensorFlow: Deep learning with TensorFlow
Using Pre-downloaded Containers
You can use these containers directly by referencing their full path:
Finding the Right Container
To see what's in each container directory:
ls /ceph/container/pytorch/    # See available PyTorch versions
ls /ceph/container/tensorflow/ # See available TensorFlow versions
2. Download Containers
If you need a specific version or container not available in the pre-downloaded collection, you can download containers from online repositories.
Popular Container Sources
- NVIDIA NGC Catalog: Optimized containers for AI/ML
- Docker Hub: Large collection of community containers
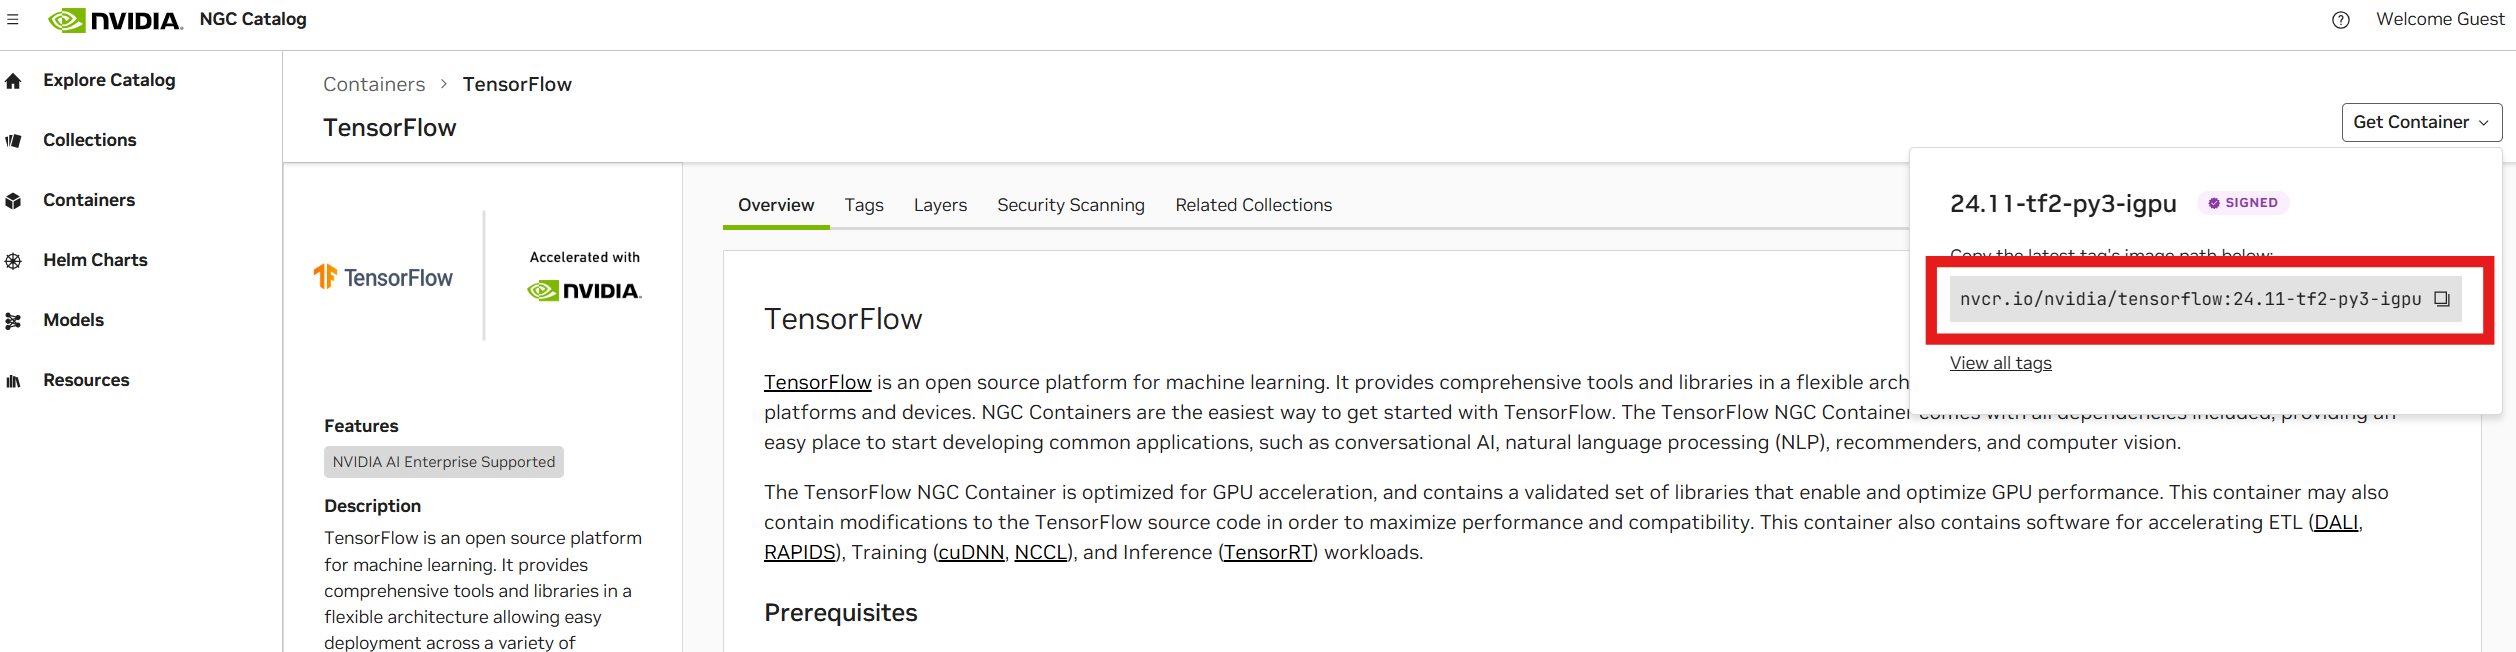
Step 1: Find Your Container
NVIDIA NGC Catalog:
- Visit NGC Catalog
- Search for your framework (e.g., "TensorFlow", "PyTorch")
- Click "Get Container" to get the URL
- Copy the URL (e.g.,
nvcr.io/nvidia/tensorflow:24.11-tf2-py3)
Docker Hub:
- Visit Docker Hub
- Search for your container
- Click on "Tags" to see available versions
- Copy the URL (e.g.,
tensorflow/tensorflow:nightly-jupyter)

Step 2: Set Up Singularity Environment
Before downloading, configure Singularity for optimal performance:
# Set up directories for Singularity
export SINGULARITY_TMPDIR="$HOME/.singularity/tmp/"
export SINGULARITY_CACHEDIR="$HOME/.singularity/cache/"

# Create the directories
mkdir -p $SINGULARITY_CACHEDIR $SINGULARITY_TMPDIR
Step 3: Download the Container
Use srun to download the container (this may take 10-20 minutes):
# Example: Download TensorFlow container
srun --mem 40G singularity pull docker://nvcr.io/nvidia/tensorflow:24.03-tf2-py3
Command explanation:
srun --mem 40G: Run on compute node with 40GB memorysingularity pull: Download and convert containerdocker://: Indicates this is a Docker container URL
Step 4: Use Your Downloaded Container
After download completes, you'll find a .sif file in your current directory:
Use it just like pre-downloaded containers:
3. Build Your Own Container
It is generally considered good practice to build your own Singularity containers, to contain the software environment for a project you wish to run on an HPC system. This is because containers represent a solution that allows robustness and reproducibility.
Create a definition file
First we need to create a definition to build our container image from. We will provide a basic example, but it also be helpful to read the official documentation page on building container images.
Bootstrap: docker
From: ubuntu:22.04

%post
    # This section is where you install software packages

    # Update the package manager (apt)
    apt update

    # install the latest Python and pip version
    apt install -y python3-pip python3-dev

    # use pip to install torch
    pip3 install torch torchvision torchaudio
Create a batch script to build from
We can now create a batch script to launch our build:
#!/usr/bin/env bash

#SBATCH --job-name=build_torch
#SBATCH --output=build_torch.out
#SBATCH --error=build_torch.err
#SBATCH --cpus-per-task=32
#SBATCH --mem=80G

export SINGULARITY_TMPDIR=$HOME/.singularity/tmp
export SINGULARITY_CACHEDIR=$HOME/.singularity/cache
mkdir -p $SINGULARITY_CACHEDIR $SINGULARITY_TMPDIR

# The path to the definition file
input_def="torch.def"

# The resulting container image
output_sif="torch.sif"

singularity build --fakeroot $output_sif $input_def
We can now build the container by launching our batch script with:
After our file has been built we can test it with:
srun --gres=gpu:1 singularity exec --nv torch.sif python3 -c "import torch ; print(torch.cuda.is_available())"
Which should output:
srun: job 767374 queued and waiting for resources
srun: job 767374 has been allocated resources
True
You are now ready to proceed to learn about using containers to run jobs