File Handling on AI-LAB
Now that you're logged into AI-LAB, it's time to learn how to navigate and manage your files. This guide will help you understand the file system structure and essential commands for working with files.
Understanding Your Environment
When you log into AI-LAB, you're placed in your user directory located at /ceph/home/domain/user. You can confirm your current location by typing pwd.
This directory is your private storage space where you can keep all your files. It's stored on a network file system, so you can access your files from any compute node within the platform.
AI-LAB File System Structure
Here's how files are organized on AI-LAB:
- /ceph AI-LAB's file system
- home user home directories
- [domain] e.g student.aau.dk
- [user] your user directory
- [domain] e.g student.aau.dk
- project shared project directories
- course directory with course specific material
- container directory with ready-to-use applications
- home user home directories
For a detailed overview of the AI-LAB storage system, click here.
Essential Linux Commands
AI-LAB runs on Ubuntu Linux, so you'll work primarily through a command-line interface. Don't worry if you're new to Linux - these essential commands will get you started.
Navigation Commands
| Command | Description | Example |
|---|---|---|
pwd |
Show current directory | pwd |
ls |
List files and folders | ls -la (detailed list) |
cd |
Change directory | cd /ceph/project |
File and Directory Management
| Command | Description | Example |
|---|---|---|
mkdir |
Create directory | mkdir my_project |
rm |
Remove file | rm old_file.txt |
rm -r |
Remove directory | rm -r old_folder |
cp |
Copy file | cp file.txt backup/ |
cp -r |
Copy directory | cp -r project/ backup/ |
mv |
Move/rename | mv old_name.txt new_name.txt |
cat |
Display file content | cat script.py |
Text Editing with Nano
Nano is a beginner-friendly text editor perfect for creating and editing scripts.
Scripts are not meant to be written directly in the terminal. If you need to write a script, you can either upload your script as a file or write the script in the text editor.
To open the text editor, where you can create or edit your script use the command nano.
Nano Keyboard Shortcuts:
- Save:
Ctrl + O, thenEnter - Exit:
Ctrl + X - Cut line:
Ctrl + K - Paste:
Ctrl + U - Search:
Ctrl + W - Help:
Ctrl + G
Transferring Files
You'll often need to move files between your local computer and AI-LAB. Here are the best methods for each operating system.
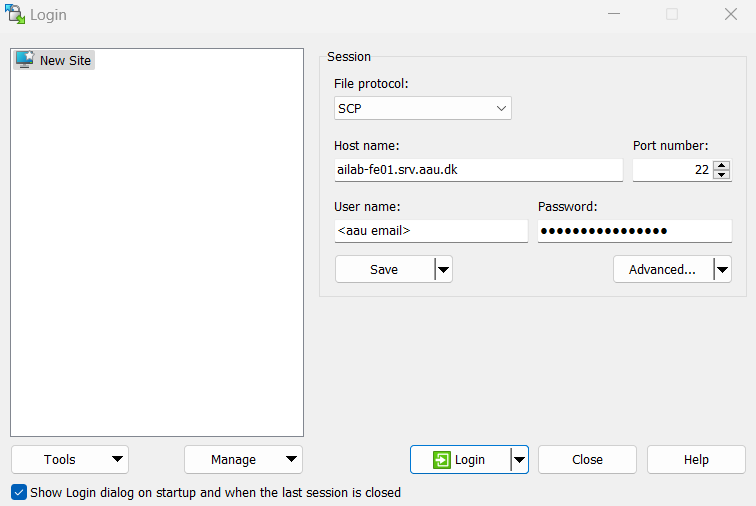
Recommended: WinSCP (Graphical Interface)
- Download and install WinSCP
- Open WinSCP and configure the connection:
- Host name:
ailab-fe01.srv.aau.dkorailab-fe02.srv.aau.dk - User name: Your AAU email address
- Password: Your AAU password
- Host name:
- Connect and you'll see a split-screen interface
- Drag and drop files between your computer (left) and AI-LAB (right)
Alternative: Command Line (PowerShell)
# Upload file to AI-LAB
scp myfile.txt user@student.aau.dk@ailab-fe01.srv.aau.dk:~/

# Upload entire directory
scp -r my_project/ user@student.aau.dk@ailab-fe01.srv.aau.dk:~/

# Download file from AI-LAB
scp user@student.aau.dk@ailab-fe01.srv.aau.dk:~/myfile.txt .

# Download entire directory
scp -r user@student.aau.dk@ailab-fe01.srv.aau.dk:~/my_project/ .
Command Line with scp
# Upload file to AI-LAB
scp myfile.txt user@student.aau.dk@ailab-fe01.srv.aau.dk:~/

# Upload entire directory
scp -r my_project/ user@student.aau.dk@ailab-fe01.srv.aau.dk:~/

# Download file from AI-LAB
scp user@student.aau.dk@ailab-fe01.srv.aau.dk:~/myfile.txt .

# Download entire directory
scp -r user@student.aau.dk@ailab-fe01.srv.aau.dk:~/my_project/ .
File Transfer Tips
- Multiple files: Compress files into a
.zipor.tar.gzarchive first - Hidden files: In WinSCP, enable "Show hidden files" in Options → Preferences → Panels
- Network issues: If transfers fail, try the other login node (
ailab-fe02)
Creating Shared Project Directories
AI-LAB allows semester groups to collaborate by creating shared project directories in /ceph/project. This guide will help you set up a secure, group-only project directory.
Who Can Create Shared Directories?
Semester Group Requirement
You can only create private shared directories with users in your semester group. If you need to collaborate with users outside your semester group, you can create a public project directory (accessible to all AI-LAB users).
Step 1: Create Your Project Directory
Navigate to the project directory and create your project folder:
Step 2: Set Up Group Permissions
Check Your Group
First, find out which semester group you belong to:
You'll see output like: user@student.aau.dk xx-43-xx-9-01@student.aau.dk
The semester group is typically the second entry (e.g., xx-43-xx-9-01@student.aau.dk).
Set Group Ownership
Assign your project directory to your semester group:
Set Directory Permissions
Make the directory accessible only to you and your group members:
What 770 means:
- 7 (owner): read, write, execute
- 7 (group): read, write, execute
- 0 (others): no access
Enable Group Inheritance
Set the setgid bit so new files automatically belong to the group:
Step 3: Verify Your Setup
Check that everything is configured correctly:
You should see output like:
The s in the group permissions indicates the setgid bit is active.
Step 4: Collaboration is Ready!
Now your project directory is set up for collaboration:
✅ Group members can:
- Access the directory
- Read, write, and create files
- Edit files created by other group members
❌ Non-group members cannot:
- Access the directory
- See or modify any files
Step 5: Handle File Upload Permissions (optional)
When you upload files from your computer, they might not have the correct group permissions. Here's how to fix this:
Option 1: Manual Fix (Quick)
Fix permissions for uploaded files manually:
Option 2: Automatic Fix (Recommended)
Set up automatic permission fixing for ongoing collaboration:
Create a permission fix script:
Add this content:
Make it executable:
Set up automatic execution:
Add this line at the bottom:
This will automatically fix permissions every 5 minutes.
Best Practices for Collaboration
- Communicate with your group about who's working on what files
- Use descriptive filenames to avoid conflicts
- Create subdirectories for different parts of the project
- Regularly check permissions if files aren't accessible to group members
- Test access by having another group member try to access the directory
Troubleshooting
"Permission denied" when group members try to access files:
- Run the permission fix script:
chmod -R g+rwX /ceph/project/my_project
Group members can't see the directory:
- Check group ownership:
ls -ld my_project - Verify group membership:
groups
Files uploaded via WinSCP aren't accessible:
- This is normal - use the permission fix script to resolve
Now that you know the basics of file handling, lets proceed to learn how to run jobs on AI-LAB